GUI 프로그래밍에서 이벤트 처리는 매우 중요합니다. 사용자가 애플리케이션에서 어떤 작업을 수행할 때마다, 그 작업은 이벤트로 인식됩니다. 이벤트에는 버튼 클릭, 마우스 이동, 키 입력 등이 포함됩니다. PyQt6는 이벤트 처리에 대한 강력한 지원을 제공합니다. 이번 게시물에서는 PyQt6 신호 및 슬롯 메커니즘에 대해 살펴보고, 이를 사용하여 이벤트 처리를 어떻게 수행할 수 있는지에 대해 자세히 알아보겠습니다.
[목차]
1. PyQt6 신호 및 슬롯?
PyQt6에서 신호와 슬롯은 이벤트 처리를 위한 메커니즘입니다. 신호는 이벤트가 발생했음을 나타내는 것이고, 슬롯은 이벤트를 처리하는 메서드입니다. 이 메커니즘은 시그널-슬롯 메커니즘이라고도 불립니다.
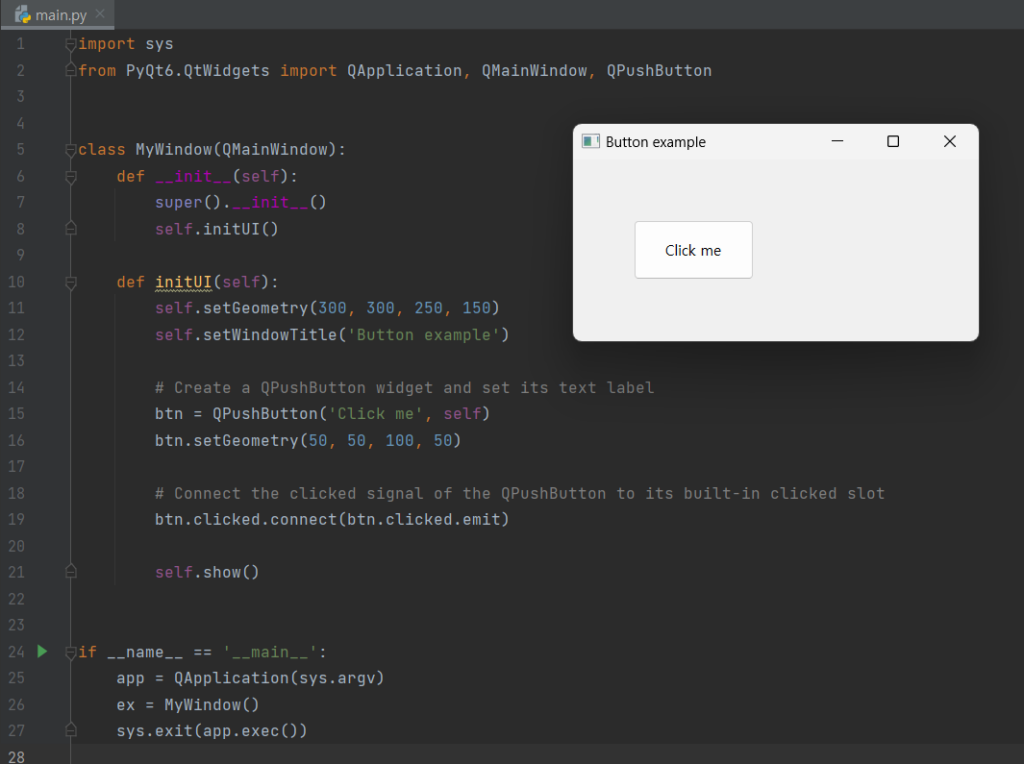
예를 들어, 버튼을 클릭하면 QPushButton 클래스의 clicked 시그널이 발생합니다. 이 시그널은 사용자가 버튼을 클릭했음을 나타냅니다. QPushButton 클래스에는 clicked 시그널을 처리하는 슬롯인 clicked 메서드가 포함되어 있습니다. 이 메서드는 버튼이 클릭되었을 때 호출됩니다.
1 2 3 4 5 6 7 8 9 10 11 12 13 14 15 16 17 18 19 20 21 22 23 24 25 26 27 28 | import sys from PyQt6.QtWidgets import QApplication, QMainWindow, QPushButton class MyWindow(QMainWindow): def __init__(self): super().__init__() self.initUI() def initUI(self): self.setGeometry(300, 300, 250, 150) self.setWindowTitle(‘Button example’) # Create a QPushButton widget and set its text label btn = QPushButton(‘Click me’, self) btn.setGeometry(50, 50, 100, 50) # Connect the clicked signal of the QPushButton to its built-in clicked slot btn.clicked.connect(btn.clicked.emit) self.show() if __name__ == ‘__main__’: app = QApplication(sys.argv) ex = MyWindow() sys.exit(app.exec()) | cs |
[실행화면]
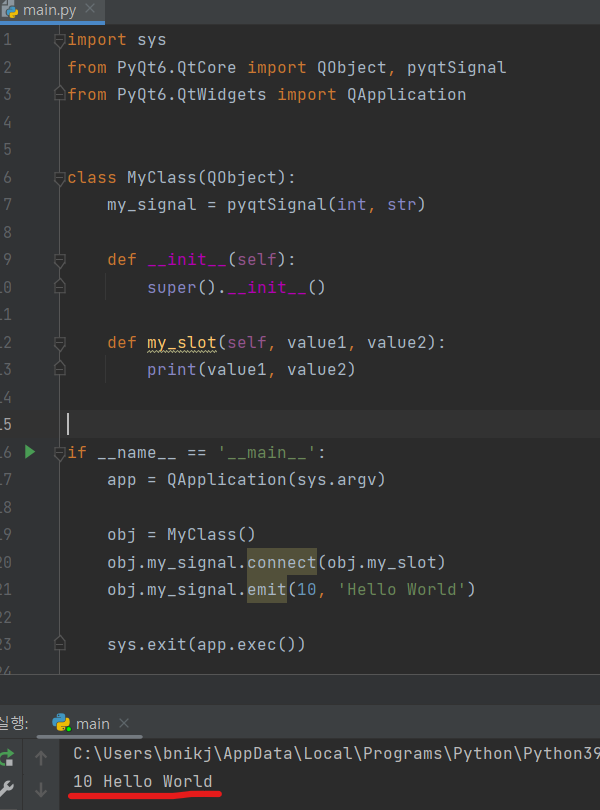
PyQt6에서는 다양한 형태의 시그널과 슬롯을 정의할 수 있습니다. 예를 들어, 다음과 같이 정수형과 문자열형 인자를 가지는 시그널과 이를 처리하는 슬롯을 정의할 수 있습니다.
1 2 3 4 5 6 7 8 | class MyClass(QObject): my_signal = pyqtSignal(int, str) def __init__(self): super().__init__() def my_slot(self, value1, value2): print(value1, value2) | cs |
my_signal은 int와 str 두 가지 인수를 가지는 신호입니다. my_slot은 my_signal을 처리하는 슬롯입니다. 이제 my_signal을 발생시키면 my_slot이 호출됩니다.
[전체코드]
1 2 3 4 5 6 7 8 9 10 11 12 13 14 15 16 17 18 19 20 21 22 23 24 | import sys from PyQt6.QtCore import QObject, pyqtSignal from PyQt6.QtWidgets import QApplication class MyClass(QObject): my_signal = pyqtSignal(int, str) def __init__(self): super().__init__() def my_slot(self, value1, value2): print(value1, value2) if __name__ == ‘__main__’: app = QApplication(sys.argv) obj = MyClass() obj.my_signal.connect(obj.my_slot) obj.my_signal.emit(10, ‘Hello World’) sys.exit(app.exec()) | cs |
[실행화면]
2. PyQt6 이벤트 처리
PyQt6에서는 다양한 이벤트를 처리할 수 있습니다. 예를 들어, 버튼을 클릭하거나 마우스를 움직이는 등의 이벤트를 처리할 수 있습니다. 이벤트를 처리하는 방법은 다음과 같습니다.
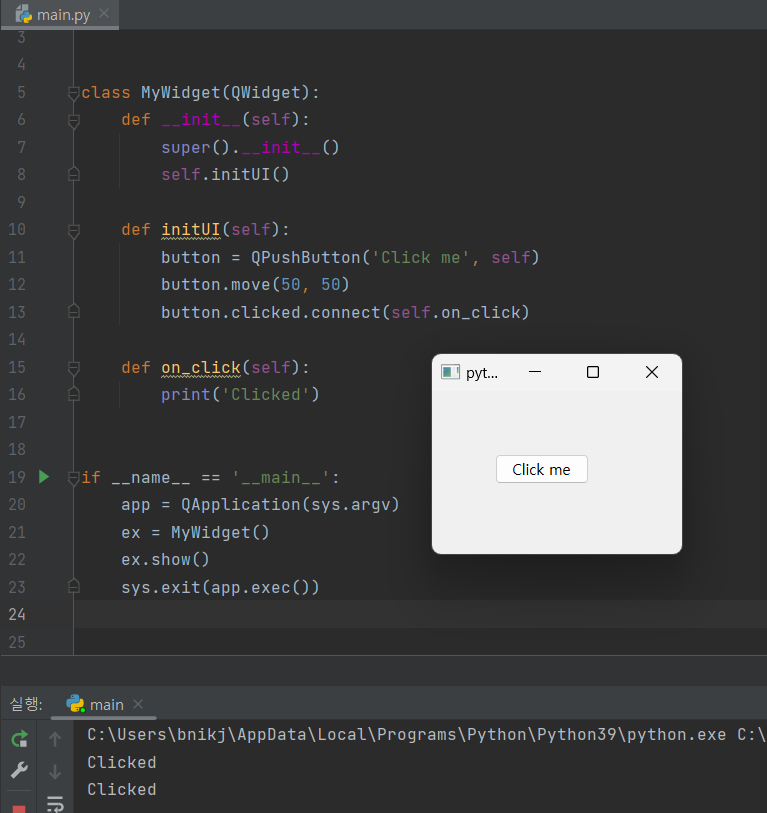
1 2 3 4 5 6 7 8 9 10 11 12 13 | class MyWidget(QWidget): def __init__(self): super().__init__() self.initUI() def initUI(self): button = QPushButton(‘Click me’, self) button.move(50, 50) button.clicked.connect(self.on_click) def on_click(self): print(‘Clicked’) | cs |
QPushButton을 생성하고 clicked 시그널을 on_click 슬롯에 연결합니다. on_click 메서드는 버튼이 클릭되었을 때 호출됩니다. 이제 버튼을 클릭하면 ‘Clicked’가 출력됩니다.
[전체코드]
1 2 3 4 5 6 7 8 9 10 11 12 13 14 15 16 17 18 19 20 21 22 23 24 25 | import sys from PyQt6.QtWidgets import QApplication, QWidget, QPushButton class MyWidget(QWidget): def __init__(self): super().__init__() self.initUI() def initUI(self): button = QPushButton(‘Click me’, self) button.move(50, 50) button.clicked.connect(self.on_click) def on_click(self): print(‘Clicked’) if __name__ == ‘__main__’: app = QApplication(sys.argv) ex = MyWidget() ex.show() sys.exit(app.exec()) | cs |
[실행화면]
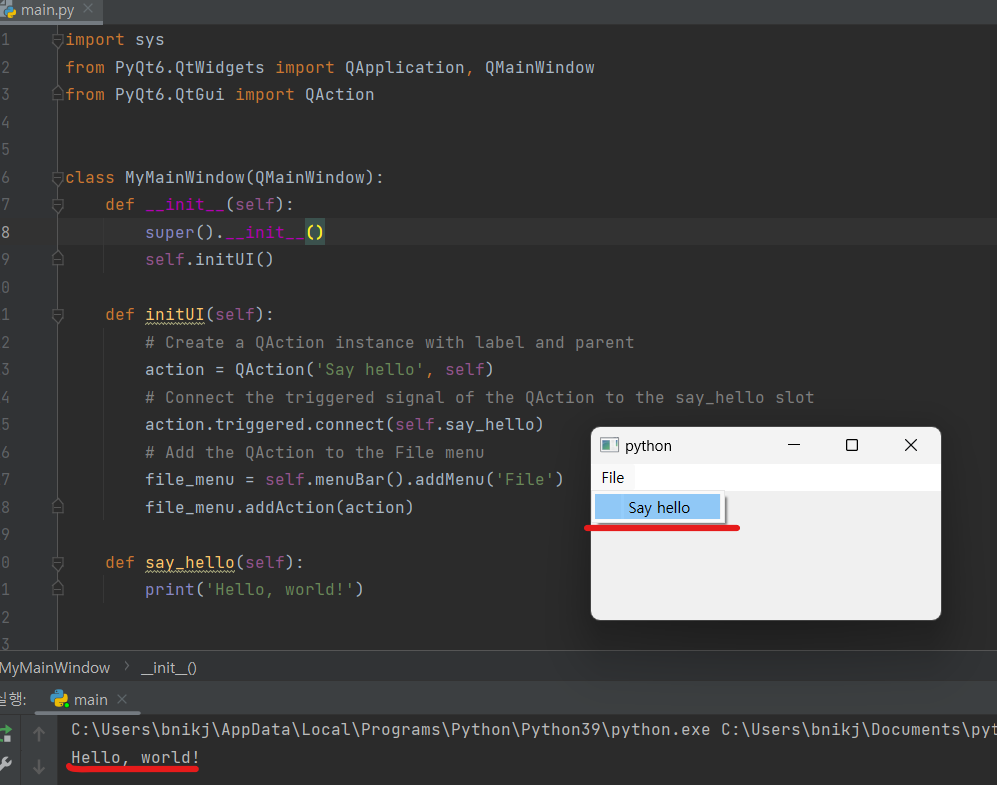
PyQt6에서는 다양한 이벤트 처리 메커니즘이 있습니다. 예를 들어, QAction 클래스에서는 triggered 시그널과 이를 처리하는 슬롯인 triggered 메서드를 제공합니다. 이 메서드는 사용자가 액션을 선택할 때 호출됩니다.
1 2 3 4 5 6 7 8 9 10 11 12 13 14 15 16 17 18 19 20 21 22 23 24 25 26 27 28 29 | import sys from PyQt6.QtWidgets import QApplication, QMainWindow from PyQt6.QtGui import QAction class MyMainWindow(QMainWindow): def __init__(self): super().__init__() self.initUI() def initUI(self): # Create a QAction instance with label and parent action = QAction(‘Say hello’, self) # Connect the triggered signal of the QAction to the say_hello slot action.triggered.connect(self.say_hello) # Add the QAction to the File menu file_menu = self.menuBar().addMenu(‘File’) file_menu.addAction(action) def say_hello(self): print(‘Hello, world!’) if __name__ == ‘__main__’: app = QApplication(sys.argv) window = MyMainWindow() window.show() sys.exit(app.exec()) | cs |
[실행화면]
3. PyQt6 key 이벤트
PyQt6에서는 키 이벤트도 처리할 수 있습니다. 예를 들어, 다음과 같이 키보드의 Enter 키를 눌렀을 때 실행되는 이벤트 처리를 구현할 수 있습니다.
1 2 3 4 5 6 7 8 9 10 11 12 13 14 | class MyWidget(QWidget): def __init__(self): super().__init__() self.initUI() def initUI(self): self.setGeometry(300, 300, 350, 250) self.setWindowTitle(‘Key event’) self.show() def keyPressEvent(self, e): if e.key() == Qt.Key_Return: print(‘Enter key pressed’) | cs |
keyPressEvent 메서드를 오버라이드하여 키 이벤트를 처리합니다. 이제 Enter 키를 누르면 ‘Enter key pressed’가 출력됩니다.
[전체코드]
1 2 3 4 5 6 7 8 9 10 11 12 13 14 15 16 17 18 19 20 21 22 | from PyQt6.QtWidgets import QApplication, QWidget from PyQt6.QtCore import Qt class MyWidget(QWidget): def __init__(self): super().__init__() self.initUI() def initUI(self): self.setGeometry(300, 300, 350, 250) self.setWindowTitle(‘Key event’) self.show() def keyPressEvent(self, event): if event.key() == Qt.Key.Key_Return: print(‘Enter key pressed’) if __name__ == ‘__main__’: app = QApplication([]) widget = MyWidget() app.exec() | cs |
[실행화면]

4. PyQt6 신호 및 슬롯, 이벤트 – 결론
PyQt6 신호 및 슬롯 메커니즘은 이벤트 처리를 간단하게 만드는 강력한 도구입니다. 이번 게시물에서는 PyQt6에서 신호와 슬롯을 사용하여 이벤트를 처리하는 방법에 대해 알아보았습니다. 이를 기반으로 PyQt6를 사용하여 다양한 유형의 이벤트를 처리할 수 있을 것입니다. 사용자 정의 pyqt6 Signals and Slots 구현하여 더욱 많은 이벤트 처리 기능을 구현할 수 있습니다.
키 이벤트도 PyQt6에서 처리할 수 있습니다. 이러한 기능들을 이용하면 더욱 다양하고 효과적인 GUI 프로그래밍을 구현할 수 있습니다.
[관련글]