파이썬 PyQt6 QTableView 사용을 통해 테이블 형식으로 데이터를 표시하는 방법을 알아보려고 합니다. 마치 엑셀과 비슷한 위젯으로 실제로 내용을 작성하고, 지우고, 수정할 수 있습니다. 데이터를 다루는 프로그램 제작시 매우 유용합니다.
[목차]
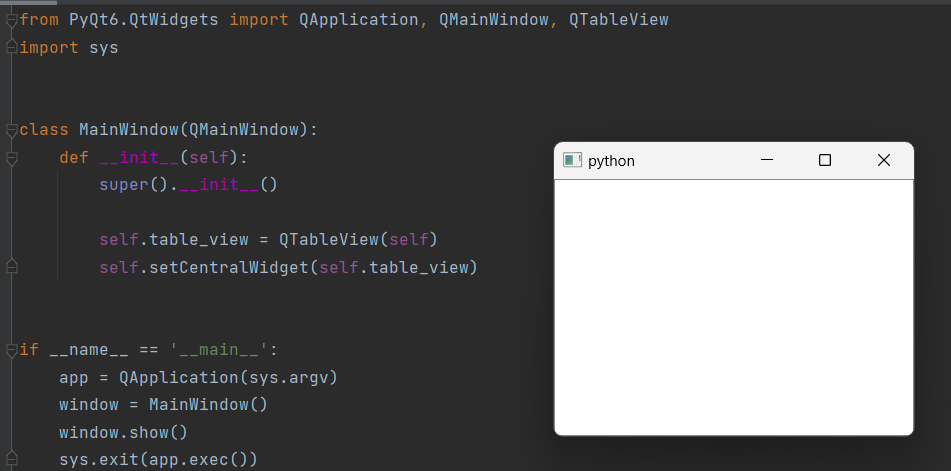
1. 파이썬 pyqt6 QTableView 생성
TableView를 생성하기 위해서는 QTableView 클래스를 사용합니다. 이 클래스는 PyQt6.QtWidgets 모듈에 포함되어 있습니다. 그럼 코드를 같이 살펴 보겠습니다.
1 2 3 4 | from PyQt6.QtWidgets import QTableView table_view = QTableView() | cs |
TableView를 생성한 후, 필요한 설정을 추가해 줄 수 있습니다. 예를 들어, TableView의 크기를 조절하거나, 각 열의 너비를 조절할 수 있습니다.
1 2 3 | table_view.resize(600, 400) # 너비 600, 높이 400으로 설정 table_view.setColumnWidth(0, 200) # 첫 번째 열의 너비를 200으로 설정 | cs |
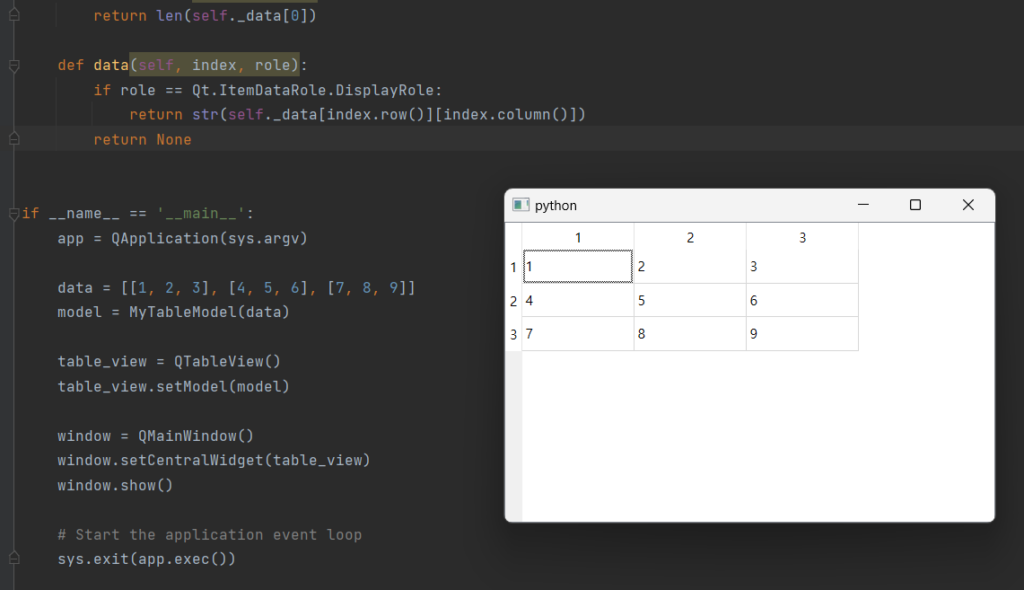
2. 파이썬 pyqt6 QTableView 데이터 보기
생성한 TableView에 데이터를 보기 위해서는 모델 클래스를 만들어야 합니다. PyQt6에서는 QAbstractTableModel 클래스를 상속받아 모델 클래스를 만들 수 있습니다. 모델 클래스에서는 데이터를 저장하고, TableView에서 필요한 데이터를 제공하는 역할을 합니다.
모델 클래스에서는 다음과 같은 메서드를 구현해야 합니다.
- rowCount(self, parent): 모델의 행(row) 수를 반환합니다.
- columnCount(self, parent): 모델의 열(column) 수를 반환합니다.
- data(self, index, role): 모델에서 특정 셀의 데이터를 반환합니다.
다음은 간단한 모델 클래스의 예시입니다:
1 2 3 4 5 6 7 8 9 10 11 12 13 14 15 16 17 18 19 20 21 22 23 24 25 26 27 28 29 30 31 32 33 34 35 36 37 38 | from PyQt6.QtCore import Qt, QAbstractTableModel from PyQt6.QtWidgets import QApplication, QMainWindow, QTableView import sys class MyTableModel(QAbstractTableModel): def __init__(self, data): super().__init__() self._data = data def rowCount(self, parent): return len(self._data) def columnCount(self, parent): return len(self._data[0]) def data(self, index, role): if role == Qt.ItemDataRole.DisplayRole: return str(self._data[index.row()][index.column()]) return None if __name__ == ‘__main__’: app = QApplication(sys.argv) data = [[1, 2, 3], [4, 5, 6], [7, 8, 9]] model = MyTableModel(data) table_view = QTableView() table_view.setModel(model) window = QMainWindow() window.setCentralWidget(table_view) window.show() # Start the application event loop sys.exit(app.exec()) | cs |
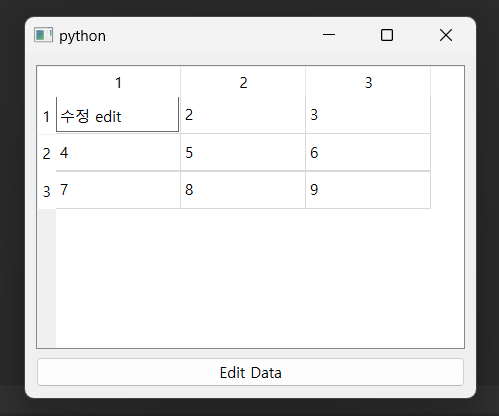
3. 파이썬 pyqt6 QTableView 데이터 수정
Edit Data 버튼 클릭시 수정 and 더블클릭시 데이터를 수정하는 예제를 만들어 보겠습니다.
1 2 3 4 5 6 7 8 9 10 11 12 13 14 15 16 17 18 19 20 21 22 23 24 25 26 27 28 29 30 31 32 33 34 35 36 37 38 39 40 41 42 43 44 45 46 47 48 49 50 51 52 53 54 55 56 57 58 59 60 61 62 63 64 65 66 67 68 69 70 71 72 73 | from PyQt6.QtCore import Qt, QAbstractTableModel from PyQt6.QtWidgets import QApplication, QMainWindow, QTableView, QPushButton, QVBoxLayout, QWidget import sys class MyTableModel(QAbstractTableModel): def __init__(self, data): super().__init__() self._data = data def rowCount(self, parent): return len(self._data) def columnCount(self, parent): return len(self._data[0]) def data(self, index, role): if role == Qt.ItemDataRole.DisplayRole: return str(self._data[index.row()][index.column()]) return None def setData(self, index, value, role): if role == Qt.ItemDataRole.EditRole: self._data[index.row()][index.column()] = value self.dataChanged.emit(index, index) return True return False def flags(self, index): return super().flags(index) | Qt.ItemFlag.ItemIsEditable class MainWindow(QMainWindow): def __init__(self): super().__init__() self.data = [[1, 2, 3], [4, 5, 6], [7, 8, 9]] self.model = MyTableModel(self.data) self.table_view = QTableView() self.table_view.setModel(self.model) self.edit_button = QPushButton(“Edit Data”) self.edit_button.clicked.connect(self.editData) layout = QVBoxLayout() layout.addWidget(self.table_view) layout.addWidget(self.edit_button) widget = QWidget() widget.setLayout(layout) self.setCentralWidget(widget) def editData(self): # Activate edit mode on the selected cell index = self.table_view.currentIndex() if index.isValid(): self.table_view.edit(index) def closeEvent(self, event): # Print the final data when closing the window print(“Final Data:”, self.data) event.accept() if __name__ == ‘__main__’: app = QApplication(sys.argv) window = MainWindow() window.show() sys.exit(app.exec()) | cs |
4. 결론 및 의견
TableView를 생성하고, 모델 클래스를 만들고, 모델을 TableView에 적용하는 방법을 살펴보았으며, TableView의 속성을 설정하여 사용자 경험을 개선하는 방법도 알아보았습니다. PyQt6를 사용하면 간단하게 GUI 프로그램을 개발할 수 있습니다. 특히, 테이블 형식의 데이터를 다루는 프로그램을 만들 경우 파이썬 pyqt6 qtableview 테이블 매우 유용한 도구입니다.
[관련글]